

Discover how I transformed my mailbox into a stylish focal point with a DIY makeover that significantly boosted my home’s curb appeal.
Recently, I tackled a quick project that significantly boosted my home’s curb appeal. Enhancing your mailbox can be a simple yet effective way to make a great first impression and increase your property’s visual appeal. Here’s a step-by-step guide on how I transformed my mailbox, turning it into a stylish focal point for my front yard. By updating the mailbox, I was able to elevate the overall look of my property and enhance its curb appeal. This DIY mailbox makeover not only improved the aesthetics but also added a personal touch to my home’s exterior. Whether you’re looking to refresh an old mailbox or completely revamp its design, this project offers a budget-friendly way to achieve noticeable results. Adding a new coat of paint, upgrading the hardware, or incorporating decorative elements are all great ways to improve your mailbox’s appearance and functionality. Follow these easy steps to give your mailbox a makeover that will complement your home’s exterior, make it stand out in the neighborhood, and elevate your curb appeal instantly.
- Medium-grit Sandpaper
- Rotary Sander
- Sanding discs
- 5 in 1 Spray Paint
- Drop Cloth or Plastic Sheeting
- Painter’s Tape
- Weed Eater
- Rake
- Top Soil
- Mulch
- Plants (Choose ones that suit your climate and sunlight!)
Step 1: Preparation
Clearing and Protecting the Area
First, remove any overgrown plants around your area that could obstruct your work. I also used my Weed Eater to clean up the surroundings of my plant bed. Next, lay down a drop cloth or plastic sheeting around the mailbox to catch any paint splatters. Alternatively, using extra cardboard can also be an effective solution for protecting the area.

Step 2: Sand It Down
Removing Build-up
Grab your medium-grit sandpaper and attach it to your rotary sander. Start the sanding process! Be sure not to stay in one spot for too long to ensure an even finish. Sanding helps remove old paint and any rust buildup. Continue sanding until you achieve your desired coastal color.

Step 3: Spray Paint
Rust Oleum 5 in 1 Spray
Shake up your can of Rust-Oleum 5 in 1 Spray Paint. Hold it about 6-8 inches away from the mailbox and spray in even strokes. Multiple thin coats are better than one thick one, it helps avoid drips and runs. Let each coat dry before applying the next one.


Step 4: Plant Time
Adding a Lattice
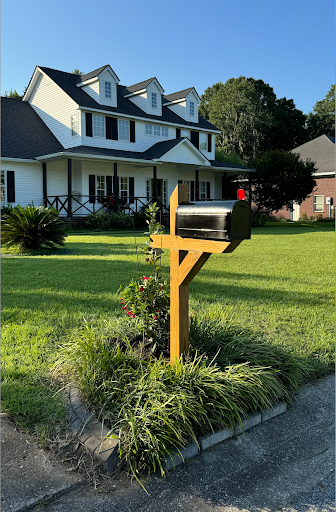
Choose plants that thrive in your climate. I selected a Mandevilla plant to add color in my front yard and because they perform well under the hot weather. Next, I dug holes around the mailbox, placed the plants in, and covered them with topsoil. While adding mulch is optional, I spread a layer around the plants to help retain moisture. The highlight for me was adding a custom wire lattice made from scrap material that I had stored under my back patio. I positioned the lattice behind the plants to prevent growth from interfering with the function of the mailbox.

This entire project took me less than a day and made a remarkable difference in curb appeal! It’s one of the most satisfying before and after transformations I’ve done. Let this be your sign to revamp your mailbox—I’m sure it could use some love. ✌️
Click the photo below to watch my Step-by-Step Tutorial Reel on Instagram!
Get visual, easy-to-follow instructions and tips for your next DIY project.


Comments will load here