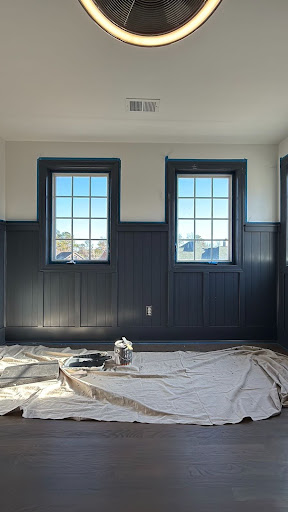
Wainscoting is such a great way to give a room a cozy, more polished feel. If your bedroom’s feeling a little bare, adding wainscoting is an easy and fun DIY project that’ll instantly add texture and charm. Whether you go for painted or wood wainscoting, it’ll make the space feel warmer and more put-together without a huge effort. Definitely worth considering if you’re looking to refresh your room!
7 Easy Steps to DIY Wainscotting
Step 1: Design and Measure the Wall
for Accurate Wainscoting Installation
Before starting your wainscoting installation, decide on your design, whether it’s a traditional raised panel style or a simple flat wainscoting design. Measure the height and width of the walls. Wainscoting typically covers the lower third of the wall, around 32″ to 36″ high, but can be customized based on your desired style. Make sure to double-check measurements for a perfect fit.

Step 2: Gather Your Materials
Once you’ve selected your wainscoting style, purchase your materials. You can buy pre-made panels, or if you’re more advanced, cut individual pieces to create custom patterns.

TIP: Before you start, ensure the wall is clean and free of any debris. Mark a horizontal line along the wall at your desired height. This will keep you on track for a straight symmetrical wainscoting. I also painted the outlets first to match the finished wainscoting so that they blend in seamlessly.
Preparation & Measuring:

Step 3: Install the Wainscoting Panels
Classic and Durable Interior Upgrade
Starting from the bottom, work your way up to the desired height for a secure wall panel installation. Align the panel with the marked reference line and use a brad nailer with 18-gauge finish nails to secure the panel to the wall. Drive the nails through the panel into the wall studs, ensuring the nails are flush with the surface for a professional, seamless finish.
TIP for Outlet Placement: A helpful trick when working around outlets is to add paint to the back corners of the outlets before installing the wainscoting. This helps leave an impression of where the outlet sits against the wall, so you can easily see where to cut out spaces in your wainscoting to fit around the outlets. Simply apply a small dab of paint to the back corners, then gently press the outlet back against the panels. It will leave marks where you need to cut, ensuring you get a precise fit.
Cutting & Fitting:
- Miter Saw
- Safety Glasses
- Laser Level
- 1 in. x 3 in. x 16 ft. Primed Pine Finger-Joint Board
- 1 in. x 2 in. x 16 ft. Primed Pine Finger-Joint Board
- 11/16 in. x 3 1/2 in. x 96 in. Primed MDF Casing
- Quarter Round Molding
- MDF Shiplap Panel
- Wood Glue

Step 4: Add Trim Molding
aka “Chair Rail“
Once all the wainscoting panels are installed, it’s time to add the trim molding to the top. This piece sits along the top edge of the wainscoting and adds a finished look to your wall paneling.
Measure and cut the molding to the length of the wall. I made sure each piece aligned with a vertical line down the molding for a clean finish. Make sure the trim is level before securing it in place. Using a laser level makes this step super easy when you only have two hands to get it all in place. Attach the trim molding to the top of the wainscoting panels using a nail gun for a secure and professional finish.
Screwing & Nailing:

Step 5: Add Vertical Panels
Gives it a Sleek, Stylish, Modern Look
Adding the vertical panels are very similar to adding the trim, using a nail gun after placing each piece with the level. I decided to add more vertical panels then my original thought to give it a more modern feel. Once completing this step it made the walls also look larger in size.
Finishing Details:
- Plastic Wood Filler
- High Strength Spackling
- Coarse Sanding Sponge
- Painters Multi-Tool
- Zenith Trim Puller
- 1/4” Backer Rod
- Plastic Wood Filler
- Fine Sanding Sponge
- Adjustable Wrench

Step 6: Caulk The Edges
Fill Gaps and Nail Holes
After installation, there will likely be gaps at the seams, around the nails, and between the panels and the wall. Use wood filler or caulk to fill these gaps for a seamless appearance. Allow the filler to dry, then sand it smooth.
For a clean, professional look, caulk along the edges of the wainscoting panels where they meet the wall and the trim. This will make it so that there are no visible gaps and that the wainscoting looks integrated into the room.
Tip: Add backerod at gaps over ⅛” and caulk over.
Caulking:

Step 7: Prime and Paint
Benjamin Moore Midnight Blue
TIP: If you used raw MDF or wood, apply a coat of primer before painting. Choose a paint color that complements your room’s decor. Many people opt for white or off-white for a classic, clean look, but you can go bold or natural with darker tones. My son chose a midnight blue that is going to last a long time as he grows into the room.
- Apply 1-2 coats of your paint. Let each coat dry before applying the next.
Painting:
- Paint Roller Tray
- Paint Tray Liner
- Midnight Blue Paint
- Ultra Spec Eggshell Paint
- 4” Mini Paint Roller Handle
- 4” Microfiber Paint Rollers
- 1” Round Paint Brush
- 2” Precision Detail Paint Brush
- Metal Paintable Outlet Cover

Comments will load here