
Learn how I crafted a stunning, budget-friendly headboard for a fraction of the price, combining creativity and affordable materials to enhance my bedroom decor.
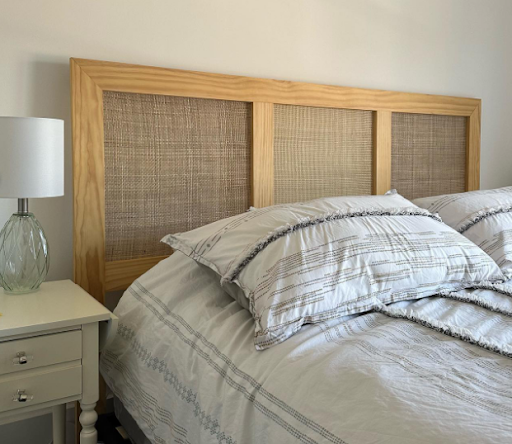
Do you know how dang expensive a headboard can be? Well, I created this stunning headboard for only a tenth of the price you’d pay in stores! By taking accurate measurements and using affordable materials, I managed to craft a beautiful and functional piece of furniture. I grabbed the overall dimensions and got to work, designing a headboard that perfectly fits my bedroom decor. With a few essential tools and a bit of creativity, I was able to build a custom headboard that rivals high-end designs at a fraction of the cost. If you’re looking to save money on bedroom upgrades or just enjoy DIY projects. This budget-friendly headboard project not only enhances the aesthetic appeal of your bedroom but also demonstrates how you can achieve stylish and high-quality results without breaking the bank. Let’s dive into this easy step-by-step guide to build a headboard that combines elegance and affordability.
Materials:
- Scrap Wood
- Cordless Drill
- Sandpaper
- Wood Glue
- Screws
- Stain (optional)
- Rattan Mesh
Step 1: Gather Your Scrap Wood
And Other Materials Needed
Start by collecting various pieces of scrap wood. Look for different sizes, textures, and colors to add character to your headboard
Step 2: Design Your Headboard
The Rustic Charm
Sketch out a rough design for your headboard. Consider the size of your bed and the overall aesthetic you want to achieve. Feel free to get creative – uneven edges and asymmetry can enhance the rustic charm.
Step 3: Prepare the Wood
Using Sandpaper
Starting with 2×4 pine we cut each to size, then using my kreg jig I pre-drilled pocket holes and proceeded to fasten each of the pieces together using screws. My dimensions are just straight from the website, 79 inches wide by 50 inches tall. Using a fine sandpaper I lightly sanded the framing, dusted it free, and then applied a very light and natural colored stain. This step not only improves the overall look but also ensures safety by minimizing the risk of splinters.
Step 4: Arrange the Pieces
Glue it Together
Lay out your scrap wood pieces according to your design. Experiment with different arrangements until you find a layout that resonates with your vision. This step is where your unique style can shine through. Apply wood glue between the pieces of scrap wood and press them firmly together. Wipe off any excess glue immediately with a damp cloth. Allow the glued pieces to dry completely before moving on to the next step.
Step 5: Reinforcement
Using Screws
Once the glue has dried, strengthen your headboard by screwing the pieces together. Drill pilot holes to prevent the wood from splitting, and then secure the pieces with screws. This ensures durability and stability.
Step 6: Trim and Shape
Use a saw to trim any excess wood or create specific shapes in your design. This step adds the final touches and allows you to refine the overall appearance of your headboard.
Step 7: Sand Again
For a Polished Look
After trimming, sand the headboard once more to achieve a polished finish. Focus on any newly cut edges and corners to maintain a cohesive and professional appearance.
Step 8: Stain or Paint
Optional
Choose to embrace the natural beauty of the wood or add a personal touch with paint or stain. This step allows you to customize your headboard to match your bedroom’s color scheme or overall theme. Through Etsy I was able to find a large roll of rattan and I unraveled it, threw it in my tub to soak for about 15 minutes which forced it to quickly flatten. Using a simple staple gun I secured each piece to the backside of my headboard framing and voila! A beautiful headboard for my guest room was born. Now I have a functional headboard, a happy wife, and a beautiful masterpiece that I can say I built.
Step 10: Mount Your Headboard
Attach your DIY headboard to the bed frame or directly to the wall. Ensure it is securely fastened, and voilà – you’ve created a unique, rustic headboard from scrap wood that adds character and warmth to your bedroom. — Enjoy your handcrafted masterpiece and the satisfaction of transforming discarded wood into a personalized piece of functional art!

Explore my other blogs for more Step By Step Tutorials!
Find detailed, easy-to-follow guides on a variety of DIY projects to help you achieve your goals.

Comments will load here