

How I designed a custom pool gate that blends seamlessly with my deck railing while adding security; follow along to see how I brought this project to life!
After one of my recent videos went viral I got a ton of messages and comments shouting that I need to add more pool security. Well, I hear you! It’s been on our minds and on my to do list.
Crafting the perfect deck gate doesn’t have to be a challenging task anymore. With the right guidance and tools, unlocking the secrets to building a functional and aesthetically pleasing gate for your deck becomes a breeze. In this article, we dive into creating a deck gate with ease, offering you tips and tricks to elevate your outdoor space. Whether you’re a seasoned DIY enthusiast or a novice looking to spruce up your deck, this comprehensive guide will walk you through the process step by step. You’ll learn everything you need to know to complete this project successfully.
Materials Needed for Building a Deck Gate
Materials:
- Miter Saw
- Cordless Drill
- Steel Pipe
- Eye Hooks
- Caster wheels
- 2 X 4 wood for Frame
- 1” balusters
- Screws
- Measuring Tape
- Woodworking Clamps
- Orbital Sander
- Sandpaper
- Level
Step 1: Creating a Plan
Design Considerations for a Deck Gate
Start by measuring the opening where the gate will be installed. Consider the width and height of the gate. Sketch a simple plan to visualize the design.

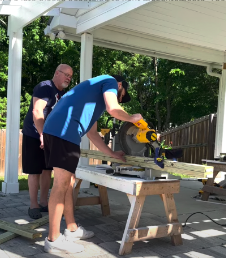
Step 2: Frame Preparation
Cut the Frame Pieces
Using the miter saw, cut the 2 x 4’s into pieces according to your measurements. These pieces will form the frame of the gate.
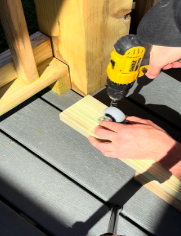
Step 3: Adding Mobility to the Gate
Attach Caster Wheels
Attach caster wheels to the bottom of the gate frame using the cordless drill. Place the wheels on one side of the frame to allow for easy sliding. Make sure the wheels are securely attached, as they will bear the weight of the gate.
Step 4: Assemble the Frame
Rectangular Measurements
Lay out the cut 2 x 4’s on a flat surface and assemble them into a rectangular frame. Use the cordless drill to secure the corners with screws. Make sure the frame is square by measuring diagonally from corner to corner; the measurements should be equal.
Step 5: Cut and Add on Support
Attach 2 x 4 Plywood and 1″ Balusters
Measure and cut the horizontal 2 x 4 plywoodd to add additional support. Arrange them along the perimeter and attach them using screws. Measure and cut the 1″ balusters to fit within the wood frame. Arrange them evenly starting in the center and attach them using screws and the cordless drill. This creates the gate’s structure.
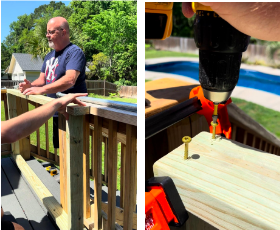
Step 6: Install Eye Hooks
At Each Corner
On the top and bottom of the gate, install eye hooks at each corner. These will be used to allow a pipe to slide through it and act as a track to keep the gate upright.

Step 7: Install the Gate
Using the cordless drill, attach the eye hooks on the gate to support structure on your deck. Ensure that the gate is level when installing.
Step 8: Finishing Touches
Finishing Touches and Painting Options
Smooth any rough edges with sandpaper. If desired, stain or paint the gate to protect it from the elements and enhance its appearance.
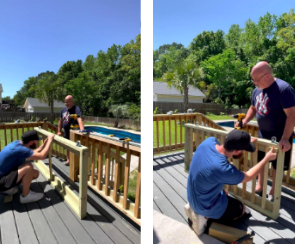
Step 9: Test the Gate
Slide the gate open and closed to ensure smooth movement. Make any necessary adjustments to the wheels or alignment.
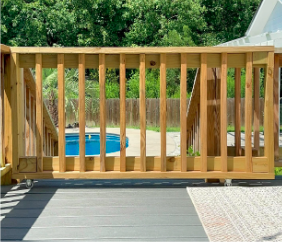
Now you have a functional sliding deck gate with wheels, providing a stylish and convenient way to access the deck space and provide extra security around your pool. Enjoy the process and the satisfaction of creating a useful addition to the outdoor living area!

Browse my other blogs for Step-By-Step Tutorials!
Find detailed guides and practical advice on various DIY projects to help you achieve your goals.

Comments will load here